I am pleased to announce today the availability of Amazon File Cache, a new high-speed cache service on AWS designed for processing file data stored in disparate locations—including on premises. File Cache accelerates and simplifies your most demanding cloud bursting and hybrid workflows by giving your applications access to files using a fast and familiar POSIX interface, no matter if the original files live on premises on any file system that can be accessed through NFS v3 or on Amazon Simple Storage Service (Amazon S3).
Imagine you have a large data set on on-premises storage infrastructure, and your end-of-month reporting typically takes two to three days to run. You want to move that occasional workload to the cloud to run it on larger machines with more CPU and memory to reduce the processing time. But you’re not ready to move the data set to the cloud yet.
Imagine another scenario where you have access to a large data set on Amazon Simple Storage Service (Amazon S3), spread across multiple Regions. Your application that wants to exploit this data set is coded for traditional (POSIX) file system access and uses command line tools like awk, sed, pipes, and so on. Your application requires file access with sub-millisecond latencies. You cannot update the source code to use the S3 API.
File Cache helps to address these use cases and many others, think about management and transformation of video files, AI/ML data sets, and so on. File Cache creates a file system–based cache in front of either NFS v3 file systems or S3 buckets in one or more Regions. It transparently loads file content and metadata (such as the file name, size, and permissions) from the origin and presents it to your applications as a traditional file system. File Cache automatically releases the less recently used cached files to ensure the most active files are available in the cache for your applications.
You can link up to eight NFS file systems or eight S3 buckets to a cache, and they will be exposed as a unified set of files and directories. You can access the cache from a variety of AWS compute services, such as virtual machines or containers. The connection between File Cache and your on-premises infrastructure uses your existing network connection, based on AWS Direct Connect and/or Site-to-Site VPN.
When using File Cache, your applications benefit from consistent, sub-millisecond latencies, up to hundreds of GB/s of throughput, and up to millions of operations per second. Just like with other storage services, such as Amazon Elastic Block Store (Amazon EBS), the performance depends on the size of the cache. The cache size can be expanded to petabyte scale, with a minimum size of 1.2 TiB.
Let’s See How It Works
To show you how it works, I create a file cache on top of two existing Amazon FSx for OpenZFS file systems. In a real-world scenario, it is likely you will create caches on top of on-premises file systems. I choose FSx for OpenZFS for the demo because I don’t have an on-premises data center at hand (I should maybe invest in seb-west-1). Both demo OpenZFS file systems are accessible from a private subnet in my AWS account. Finally, I access the cache from an EC2 Linux instance.
I open my browser and navigate to the AWS Management Console. I search for “Amazon FSx” in the console search bar and click on Caches in the left navigation menu. Alternatively, I go directly to the File Cache section of the console. To get started, I select Create cache.
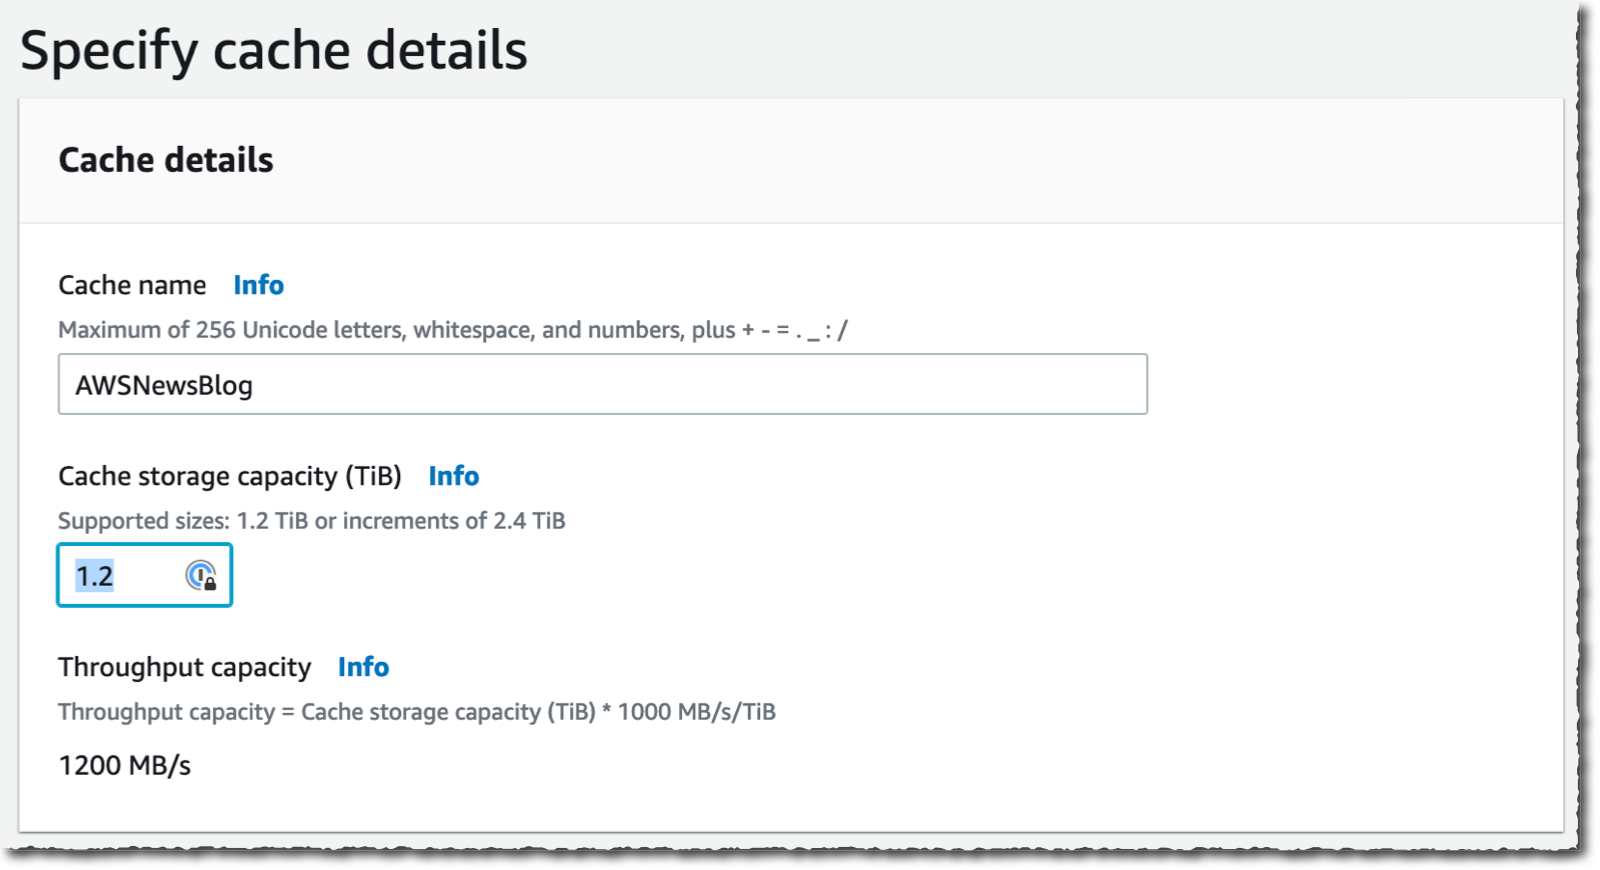
 I enter a Cache name for my cache (AWSNewsBlog for this demo) and a Cache storage capacity. The storage capacity is expressed in tebibytes. The minimum value is 1.2 TiB or increments of 2.4 TiB. Notice that the Throughput capacity increases as you choose large cache sizes.
 I check and accept the default values provided for Networking and Encryption. For networking, I might select a VPC, subnet, and security group to associate with my cache network interface. It is recommended to deploy the cache in the same subnet as your compute service to minimize the latency when accessing files. For encryption, I might use an AWS KMS-managed key (the default) or select my own.
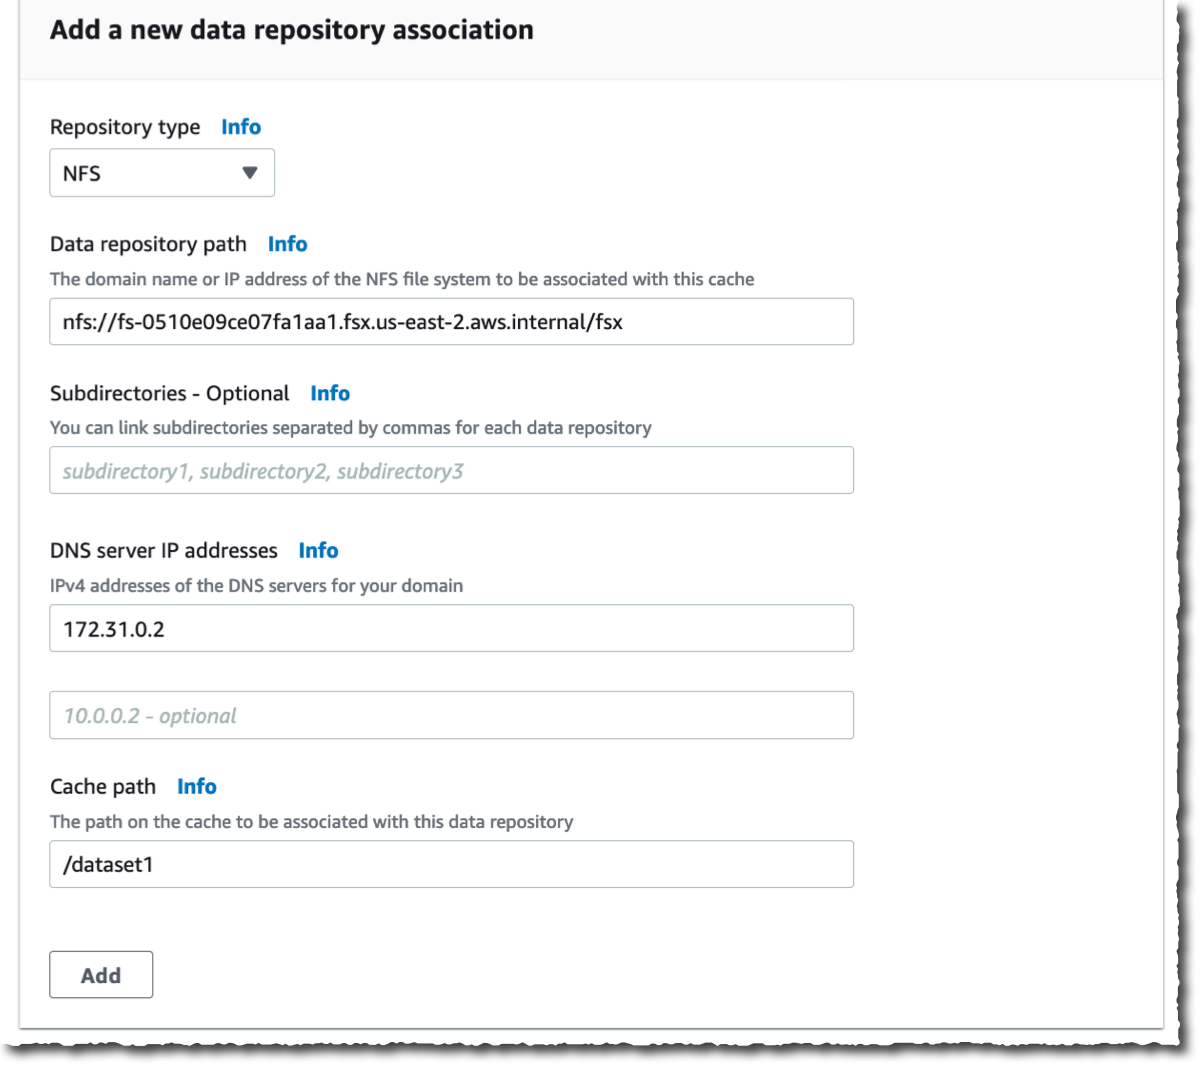
Then, I create Data Repository Association. This is the link between the cache and a data source. A data source might be an NFS file system or an S3 bucket or prefix. I might create up to eight data repository associations for one cache. All Data Repository Associations for a cache have the same type: they are all NFS v3 or all S3. If you need both, you can create two caches.
In this demo, I choose to link two OpenZFS file systems on my AWS account. You can link to any NFS v3 servers, including the ones you already have on premises. Cache path allows you to choose where the source file system will be mounted in the cache. The Data repository path is the URL to your NFS v3 or S3 data repository. The format is nfs://hostname/path or s3://bucketname/path.
The DNS server IP addresses allows File Cache to resolve the DNS name of your NFS server. This is useful when DNS resolution is private, like in my example. When you are associating NFS v3 servers deployed in a VPC, and when using the AWS-provided DNS server, the DNS server IP address of your VPC is the VPC Range + two. In my example, my VPC CIDR range is 172.31.0.0, hence the DNS server IP address is 172.31.0.2.
Do not forget to click on the Add button! Otherwise, your input is ignored. You can repeat the operation to add more data repositories.
 |
 |
Once I have entered my two data repositories, I select Next, and I review my choices. When I am ready, I select Create cache.

After a few minutes, the cache status becomes  Available.

The last part is to mount the cache on the machine where my workload is deployed. File Cache uses Lustre behind the scene. I have to install the Lustre client for Linux first, as explained in our documentation. Once done, I select the Attach button on the console to receive the instructions to download and install the Lustre client and to mount the cache file system. To do so, I connect to an EC2 instance running in the same VPC. Then I type:
sudo mount -t lustre -o relatime,flock file_cache_dns_name@tcp:/mountname /mntThis command mounts my cache with two options:
relatime– Maintainsatime(inode access times) data, but not for each time that a file is accessed. With this option enabled,atimedata is written to disk only if the file has been modified since theatimedata was last updated (mtime) or if the file was last accessed more than a certain amount of time ago (one day by default).relatimeis required for automatic cache eviction to work properly.flock– Enables file locking for your cache. If you don’t want file locking enabled, use the mount command without flock.
Once mounted, processes running on my EC2 instance can access files in the cache as usual. As I defined at cache creation time, the first ZFS file system is available inside the cache at /dataset1, and the second ZFS file system is available as /dataset2.
$ echo "Hello File Cache World" > /mnt/zsf1/greetings

$ sudo mount -t lustre -o relatime,flock fc-0280000000001.fsx.us-east-2.aws.internal@tcp:/r3xxxxxx /mnt/cache

$ ls -al /mnt/cache
total 98
drwxr-xr-x 5 root root 33280 Sep 21 14:37 .
drwxr-xr-x 2 root root 33280 Sep 21 14:33 dataset1
drwxr-xr-x 2 root root 33280 Sep 21 14:37 dataset2

$ cat /mnt/cache/dataset1/greetings
Hello File Cache World
I can observe and measure the activity and the health of my caches using Amazon CloudWatch metrics and AWS CloudTrail log monitoring.
CloudWatch metrics for a File Cache resource are organized into three categories:
- Front-end I/O metrics
- Backend I/O metrics
- Cache front-end utilization metrics
As usual, I can create dashboards or define alarms to be informed when metrics reach thresholds that I defined.
Things To Keep In Mind
There are a couple of key points to keep in mind when using or planning to use File Cache.
First, File Cache encrypts data at rest and supports encryption of data in transit. Your data is always encrypted at rest using keys managed in AWS Key Management Service (AWS KMS). You can use either service-owned keys or your own keys (customer-managed CMKs).
Second, File Cache provides two options for importing data from your data repositories to the cache: lazy load and preload. Lazy load imports data on demand if it’s not already cached, and preload imports data at user request before you start your workload. Lazy loading is the default. It makes sense for most workloads since it allows your workload to start without waiting for metadata and data to be imported to the cache. Pre loading is helpful when your access pattern is sensitive to first-byte latencies.
Pricing and Availability
There are no upfront or fixed-price costs when using File Cache. You are billed for the provisioned cache storage capacity and metadata storage capacity. The pricing page has the details. In addition to File Cache itself, you pay for S3 request costs, AWS Direct Connect charges, and the usual data transfer charges for inter-AZ, inter-Region, and internet egress traffic between File Cache and the data sources.
File Cache is available in US East (Ohio), US East (N. Virginia), US West (Oregon), Asia Pacific (Singapore), Asia Pacific (Sydney), Asia Pacific (Tokyo), Canada (Central), Europe (Frankfurt), Europe (Ireland), and Europe (London).
Now go build and create your first file cache today!
from AWS News Blog https://aws.amazon.com/blogs/aws/amazon-file-cache-a-high-performance-cache-on-aws-for-your-on-premises-file-systems/